I really struggled to find accurate information on how to create a Jenkins slave on windows and have that slave set up as a service. So here it is...
We're currently using Windows 7 for the slaves with Jenkins 1.638.
In the Jenkins web client
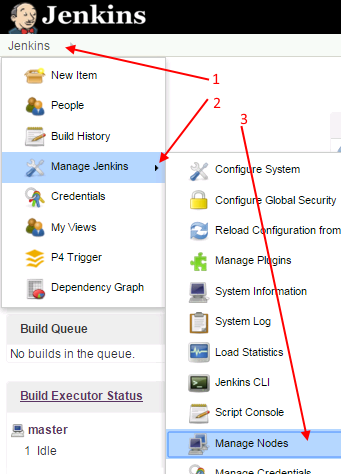
Hover over the small "Jenkins" text and a small black down arrow will appear, click it
Now hover over "Manage Jenkins"
and then select the "Manage Nodes" option

Next, on the "Manage Nodes" page
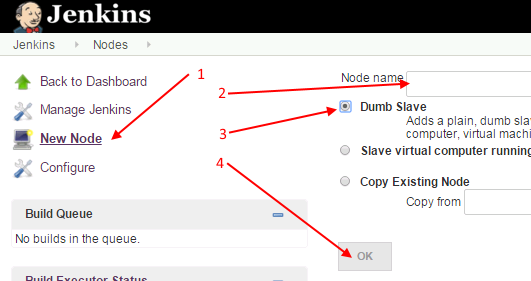
Choose the "New Node" option on the left
On the next page give the new node a name (I'd suggest setting the node name to the name of the machine)
Choose the "Dumb Slave option" - Note that the node name is case sensitive so wherever you refer to it you'll need to use the exact same name you specify here
Click the "OK" button

You'll now be taken to a page for the new node where you should
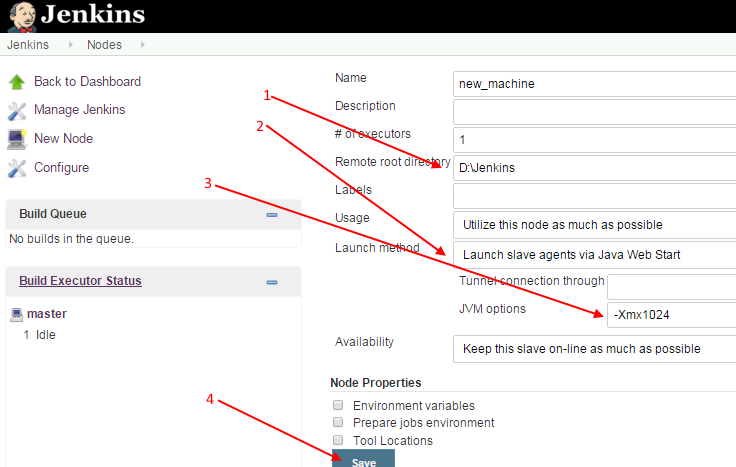
Set the "Remote root directory" to a folder somewhere on the slave
Set the "Launch method" to "Launch slave agents via Java Web Start"
Assuming your slave has more than a couple of GB or RAM then it's also worth adding "-Xmx1024" to the "JVM options" or you may encounter some nasty out of memory errors from java on the slave - if you don't see the "JVM options" section then click the "Advanced" button on the right hand side under the "Launch method"
Click the "Save" button

From the list of nodes click on the one you just created and you will be taken to a page where there will be a command line. You will need to copy the full line and make it available to the slave. In the following diagram:
Should be the Jenkins master machine
is the secret for the Jenkins slave - make sure you make a note of this, you'll need it on the slave in a minute
Click the slave.jar link to download the slave.jar file and copy it to the slave, let's say to D:\Jenkins\slave.jar

On the Jenkins slave to be
Download and install the Java Runtime Environment.
Download and install the Windows Resource Kit. You will likely be prompted with a message suggesting that the Resource Kit is not compatible with Windows 7, simply assure the installer that you know what you're doing and install it anyway.
Create a blank service called "Jenkins Slave" by running the following from a command prompt:
"C:\Program Files (x86)\Windows Resource Kits\Tools\instsrv.exe" "Jenkins Slave" "C:\Program Files (x86)\Windows Resource Kits\Tools\srvany.exe"Under the registry key:
HKEY_LOCAL_MACHINE\SYSTEM\CurrentControlSet\Services\Jenkins SlaveCreate a string value "Description"
Populate it with "Jenkins Continuous Integration Slave"

Create a new key "Parameters"
Under "Parameters" create a new string value "Application"
Populate it with the full path to java.exe, something like "C:\Program Files (x86)\Java\jre1.8.0_66\bin\java.exe"
Under "Parameters" Create a new string value "AppParameters"
Populate it with
"-jar D:\jenkins\slave.jar -jnlpUrl http://jenkins-master:8080/computer/new_machine/slave-agent.jnlp - secret 96c9999999999999999999999999999999999999999"The slave.jar should point to the correct location
The Jenkins master machine name should be correct
The new Jenkins slave machine should be correct
Make sure you use the secret for this machine that you copied from the master when adding the new node

Open the Services application from Control Panel - Administrative Tools, find the "Jenkins Slave" service, right click on the service and go to "Properties".
Go to the "Recovery" tab and change "First failure" and "Second failure" to "Restart the Service" - occasionally we found it wouldn't start up first time out
Go to the "Log On" tab and set an account and password- we found that using an account with local admin rights on the slave machine worked best but this is probably unnecessary
Go to the "General" tab and change the "Startup type" to "Automatic" - make sure the service starts up when you restart the slave
Click the "OK" button
Now start the service
In the Jenkins web client
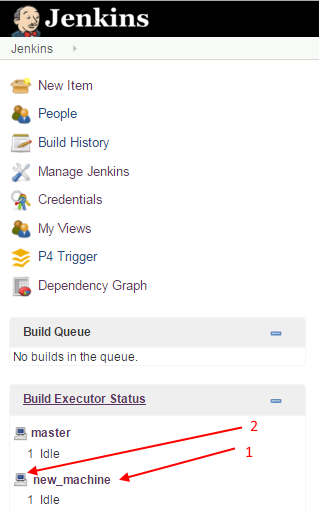
Give it a few seconds and you should see the new slave come on line in the Jenkins web client:
It should appear as the machine's name
And the little picture of a computer will no longer have a little red x next to it

That's it.
Let me know if you have any problems...